Replacing ND front wheel hub/bearing

26 December 2023 / Story & photos by Bryan Shedden
My 1.5L ND is now 8 years old and has covered over 167,000km. Over the last year, I've been hearing the tell-tale sign of a dodgy front wheel bearing. When carrying a bit of speed through a righthand turn, the front-left wheel was making a humming noise. It was nothing near as bad as I've had the past with my old NA and NB, but the wheel bearing was clearly on the way out. Strangely, when I asked my Mazda service centre to check it out, they were unable to replicate the noise! Anyway, I knew what I needed to do and picked up a replacement wheel hub/bearing from MX5 Mania. As I'm now on school holidays, and the weather on Boxing Day was a bit damp, now was an ideal opportunity to get the job done.
Front wheel hub/bearings in NCs and NDs are a bit different to NAs/NBs. The older cars have a large axle nut that locks the hub in place and NA/NB owners who do track days become familiar with replacing front wheel hubs as they tend to be a consumable item. However, NCs and NDs have a wheel hub/bearing that slots firmly into the aluminium hub carrier and is held in place with 4 (NC) or 3 (ND) bolts. Removing the bolts is easy, but getting the old hub out of the hub carrier is notoriously difficult. Most "how-to" guides involve a lot of bashing with a hammer and inevitable swearing. When I've previously needed to replace the wheel hub/bearings on my NC, I opted to give the job to a local mechanic. This time around with my ND, I discovered a neat trick to remove the hub, thanks to this Youtube video from the UK, and decided to try it myself.
.
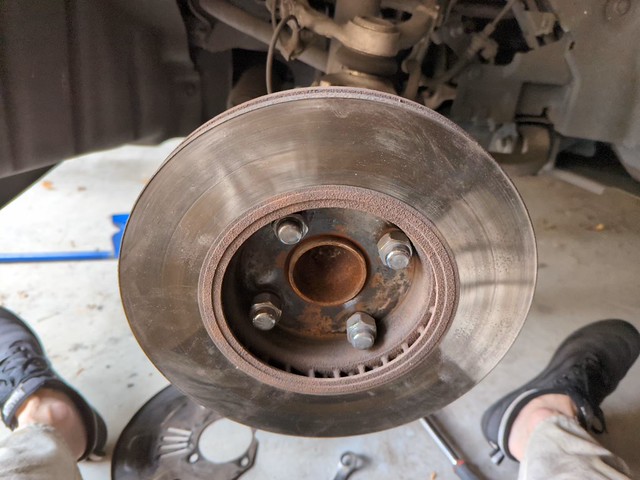
First job was to put the front up on jack stands, then remove the wheel. Removing two small bolts allowed me to slide the brake caliper out of the way and set it aside on top of the lower control arm, then remove the brake pads. Removing another two large bolts allowed me to take off the caliper bracket and then the brake disc pulled straight off. Removing the little bolt on the back of the hub allowed me to unplug the ABS sensor. Now to remove the wheel hub which was firmly wedged into the corroded hub carrier. As per the video, I found a couple of suitable nuts, bolts and washers, slotted a socket over the end of the bolt and set to work by turning the nut anticlockwise while locking the bolt head in place, which pushed the socket away.

I didn't use a straight edge like the guy used in the video because I couldn't find anything suitable and I didn't want to cut away the brake dust cover. I tried to wedge the bolts between the back of the hub and the edge of the control arm, but there was little space and not very successful. On the left side (front of the car) I had to use a tiny bolt & nut with socket (not the one shown above), and ended up bending the bolt when attempting to push the hub out!

I then had a brainwave and temporarily refitted the brake rotor in the reverse orientation (outside facing in) and locked it in place with the four wheel nuts. This gave me much more room to fit the bolt & socket between the disc surface and the hub carrier, and I ended up positioning the bolt & socket at the top and bottom. The hub came off very quickly and easily after this.
The picture below shows the hub carrier at the top and the hub still attached to the brake rotor on the ground below.
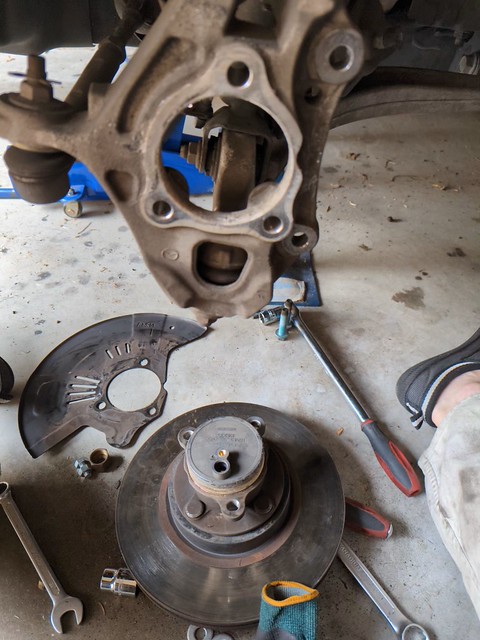
And here is the old wheel hub/bearing.

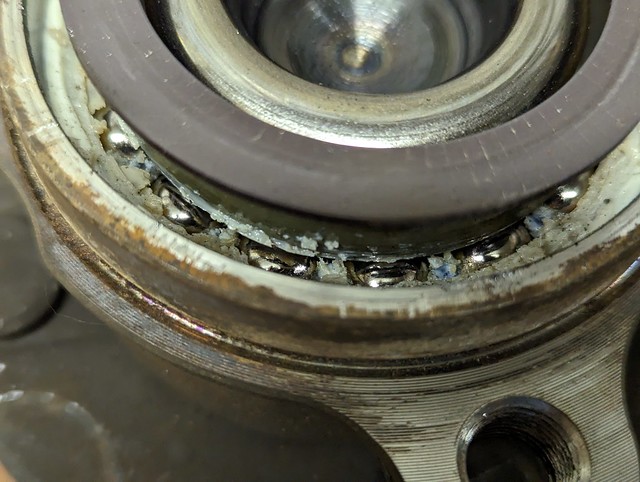
The hub carrier was caked in white corrosion product resulting from years of weathering and the dissimilar metal contact between aluminium of the hub carrier and steel of the hub which caused galvanic corrosion of the aluminium. I gave the carrier a quick clean up with a wire brush fitted to a Dremel. Here it is after the wire brush treatment.

The video below compares the old and new wheel hub/bearing. The old one was pretty noisy and when I pried off the rear cover, I could see that the bearing grease was dry and degraded.
Fitting the new wheel hub/bearing was pretty much a reverse of the previous steps, although I did apply a thin film of high temperature grease to the surface of the hub carrier before securing the hub with the three bolts. I also relubricated the brake slider pins with brake grease to avoid potential issues with uneven pad wear. I took the car for a test drive - everything seemed to be working fine and the annoying bearing noise was gone.
All up this job took me about two hours from start to finish, which wasn't too bad. If you plan to try this yourself, please keep in mind that I am an amateur who only does basic work on my MX-5, like oil changes and replacing brake pads. No responsibility will be accepted for any advice provided here.
